 If you are anything like me, sometimes you need directions. Whether its directions to a relative’s home or simply getting you to a general area. Using the Map app in Windows 10 is a great help with getting directions to where you want to go. Just like Google Map or a mapping app on your phone, you can enter the address for two locations and get directions. The Windows 10 Map app, however, has an additional feature that is great for helping get from one area to a general location—Draw for Directions. With Draw for Directions, you simply draw on the map where you want to go, and the Map app calculates possible routes you can take. To use this feature, follow these steps:
- Press the Windows key and type (without quotes) “Map” and press Enter. Windows launches the Map app.
- In the upper-right area of the Map app, click on the Windows Ink Tool Bar. You will then see a small drop-down of Windows Ink tools.
- Select the Directions Tool (the middle tool) to use the Draw for Directions feature.
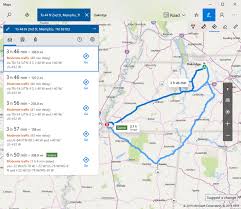
- Specify the area you want to begin with by left-clicking your mouse, then hold down the mouse button as you draw a line to the area to which you wish to go. The Map app will then calculate the possible routes you can take to get to your desired location.
This feature is great when you are familiar with either the starting or ending location and just need the general directions between two locations. You don’t need to worry about drawing a perfect route as the Map app looks more at the starting and ending location and determines the fastest routes between the two points.
For more information on solutions for running your businesses’ technology more efficiently, visit our website or contact Megan Meisner at mmeisner@launchpadonline.com or 813 448-7100 x210.
This was originally posted by Eric Wyatt for Windowstips.net.